This article will guide you through the process of installing our first-party tracking on your MyStore webshop. The installation itself will happen through Google Tag Manager because MyStore already has a nice integration with it.
About our tracking
Our first-party tracking relies on two javascript files that need to be installed on your website. The first script is our ‘entrypoint’ script and takes care of the placing the first-party cookies. This script needs to be placed on all pages of your website. The second script is our ‘checkout’ script which will read the first-party cookie and send all transaction data to our tracking server. This script needs to be placed on the order confirmation pages (a.k.a. ‘thank you page’).
Installing Google Tag Manager (GTM)
If you already have Google Tag Manager running on your MyStore webshop you can skip this step. Otherwise continue by following the steps.
-
Start be creating a new Google Tag Manager account here: https://marketingplatform.google.com.
-
Add your newly created Google Tag Manager to your MyStore shop by following these instructions: https://www.mystore.no/docs/oppsett-av-google-tag-manager/
Installing the entrypoint script
Start by copying the scrip that is added below. Make sure to replace YOUR_OFFER_SLUG with the actual value you received from your account manager.
<script type="text/javascript">
    window.tmt_offer_sid = 'YOUR_OFFER_SLUG';
    (function() {
        var timestamp = +new Date;
        var po = document.createElement('script'); po.type = 'text/javascript'; po.async = true;
        po.src = '//cdn.tmtarget.com/tracking/s/entrypoint_v2.min.js?t=' + timestamp;
        var s = document.getElementsByTagName('script')[0]; s.parentNode.insertBefore(po, s);
    })();
</script>
Next, in Google Tag Manager do the following:
-
Create a new tag and choose a descriptive name, for example: “TC Tracking Entrypoint”
-
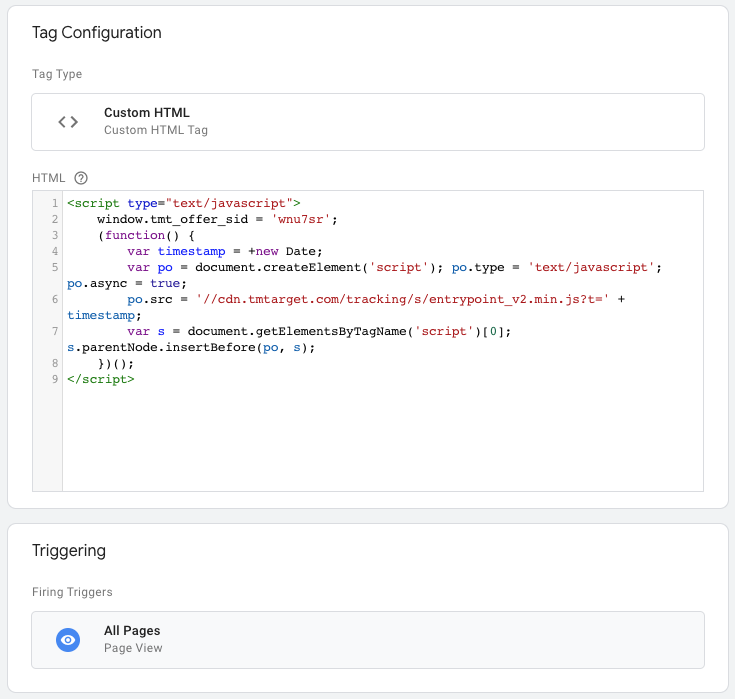
In the Tag Configuration choose ‘Custom HTML’ as the tag type.
-
Copy paste the entrypoint code from above in the HTML field that appears (make sure you added your offer slug!).
-
As trigger choose the default ‘All Pages’ option.
-
Click save and you’re done!
When you’re done it should look similar to this:
Installing the checkout script
The checkout script requires the transaction ID and transaction amount that are passed from MyStore to the datalayer of Google Tag Manager. To use that data in GTM we need we need to add some Variables.
Creating Variables in GTM
The transaction ID we can just use as it is passed from MyStore and so is easy to configure:
-
Start by navigating to ‘Variables’ in GTM’s main navigation. Scroll down to ‘User-Defined Variables’ and click the New button to create a new one.
-
Choose a descriptive name, such as: ‘MyStore Transaction ID’.
-
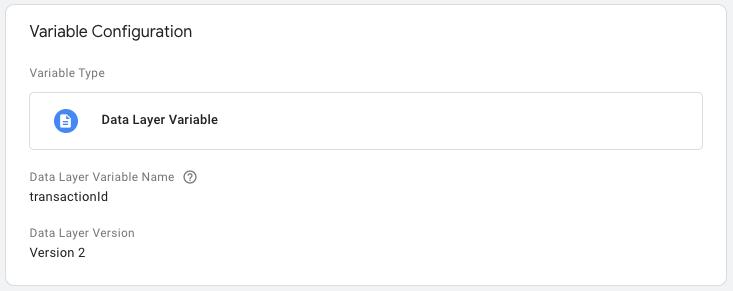
In the Variable configuration, choose ‘Data Layer Variable’ as variable type.
-
Set
transactionIdas Data Layer Variable Name. It is important it is exactly spelled as that (tip: just copy-paste). -
You can leave the datalayer version on its default value and just save the variable.
To set up the transaction ID variable we need to calculate it first. MyStore is passing the Transaction Total, Shipping and Tax separately. The Transaction Total is including the shipping and tax but we don’t want to pay commission over those values, so we need to subtract them. First we are going to create variables for the data passed by MyStore: Transaction Total, Transaction Shipping and Transaction Tax. Then we are going to create another variable that subtracts the shipping and tax from the transaction total.
Create the following variables using the same steps as we used when setting up the Transaction ID variable, just make sure to use the correct value in the forth step.
-
Create a new variable for ‘Transaction Total’ using
transactionTotalas Data Layer Variable Name. -
Create a new variable for ‘Transaction Shipping’ using
transactionShippingas Data Layer Variable Name. -
Create a new variable for ‘Transaction Tax’ using
transactionTaxas Data Layer Variable Name.
Now we are going to create the variable that is calculating the Net Transaction Total by subtracting the shipping and tax from the total.
-
Create a new variable with a descriptive name, such as: ‘MyStore Transaction Total Net’
-
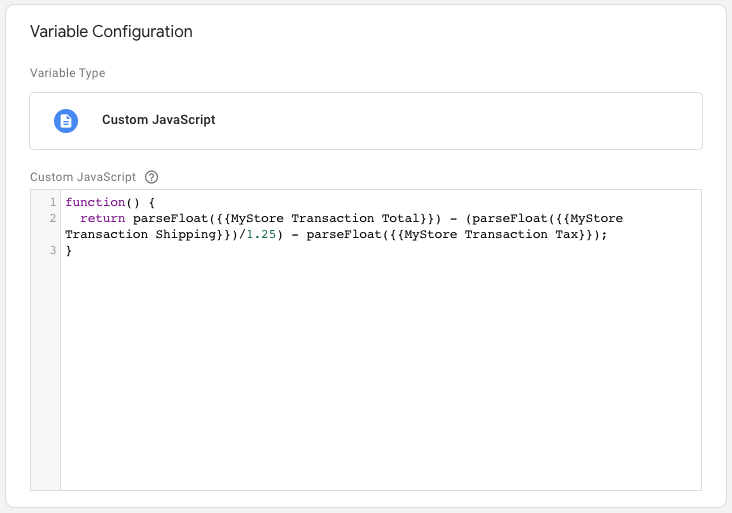
In the Variable configuration, choose ‘Custom JavaScript’ as variable type.
-
Copy paste the script below in the ‘Custom JavaScript’ field and save the variable. Make sure the names within the double curly brackets
#{{}}are exactly matching the names you’ve chosen for the variables we set up earlier.
function() {
  return parseFloat(#{{MyStore Transaction Total}}) - (parseFloat(#{{MyStore Transaction Shipping}})/1.25) - parseFloat(#{{MyStore Transaction Tax}});
}
Creating checkout trigger
Now the variables are configured we need to create a new trigger for the checkout script.
-
Navigate to ‘Triggers’ in the main navigation of GTM.
-
Create a new trigger and choose a descriptive name.
-
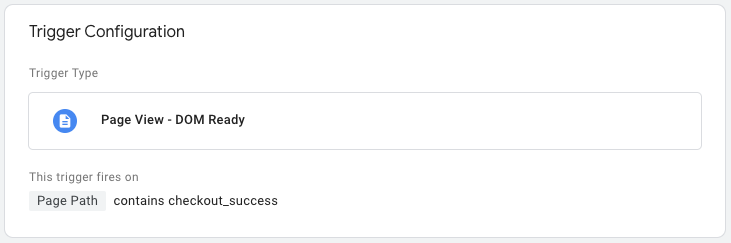
As trigger type choose
DOM Ready. -
For ‘This trigger fires on’ select
Some DOM Ready Events'. -
Then as firing conditions set
Page Pathcontainscheckout_successand make sure to customise the last part (‘checkout_success’) if you have different order success page.
Creating checkout tag
As final step we need to create the checkout tag. You can copy the checkout script from below. Make sure to replace YOUR_OFFER_SLUG and YOUR_EVENT_SLUG with the actual value you received from your account manager and that the names within the double curly brackets #{{}} exactly match the names of the variables we created earlier.
<script>
  (function() {
    var el = document.createElement('script');
    el.setAttribute('src', '//cdn.trackmytarget.com/tracking/s/checkout.min.js');
    el.setAttribute('data-type', 'sale');
    el.setAttribute('data-offer-sid', 'YOUR_OFFER_SLUG');
    el.setAttribute('data-event-sid', 'YOUR_EVENT_SLUG');
    el.setAttribute('data-id', '#{{MyStore Transaction ID}}');
    el.setAttribute('data-amount', '#{{MyStore Transaction Total Net}}');
    el.setAttribute('data-currency', 'NOK');
    document.body.appendChild(el);
  })();
</script>-
Navigate to ‘Tags’ in the main navigation of GTM.
-
Create a new tag and give it a descriptive name. For example “TC Tracking Checkout”.
-
In the Tag Configuration choose ‘Custom HTML’ as the tag type.
-
Copy paste the checkout code from above in the HTML field that appears (Don’t forget to replace the offer and event slug!).
-
As trigger choose the trigger we created previously and save the tag.
Publish the changes
Now everything is set we need to publisher the changes in Google Tag Manager. After that you should check if everything is working by performing a test transaction.