Our first-party tracking relies on two javascript files that need to be installed on your website. The first script is our ‘entrypoint’ script and takes care of the placing the first-party cookies. This script needs to be placed on all pages of your website. The second script is our ‘checkout’ script which will read the first-party cookie and send all transaction data to our tracking server. This script needs to be placed on the order confirmation pages (a.k.a. ‘thank you page’).
Tracking setup in the platform
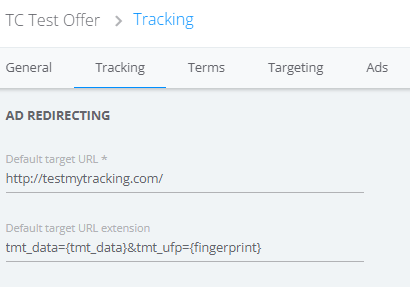
For the first-party cookie tracking please add tmt_data={tmt_data}&tmt_ufp={fingerprint} in the default target URL extension field of the offer tracking settings:
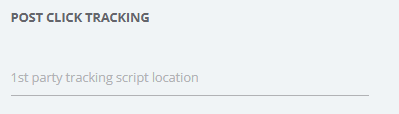
Besides that, you have to leave the 1st party tracking script location empty:
Installing the entrypoint script
The entrypoint script needs to be installed on all pages of your website. It should be placed as high on the page as possible to ensure it loads successfully. We suggest placing it right after the <body> opening tag.
You can grab the scrip below. Make sure to replace YOUR_OFFER_SLUG with the actual value you received from your account manager.
<script type="text/javascript">
    window.tmt_offer_sid = 'YOUR_OFFER_SLUG';
    (function() {
        var timestamp = +new Date;
        var po = document.createElement('script'); po.type = 'text/javascript'; po.async = true;
        po.src = '//cdn.tmtarget.com/tracking/s/entrypoint_v2.min.js?t=' + timestamp;
        var s = document.getElementsByTagName('script')[0]; s.parentNode.insertBefore(po, s);
    })();
</script>
Installation with Google Tag Manager
The installation with Google Tag Manager is very straightforward:
-
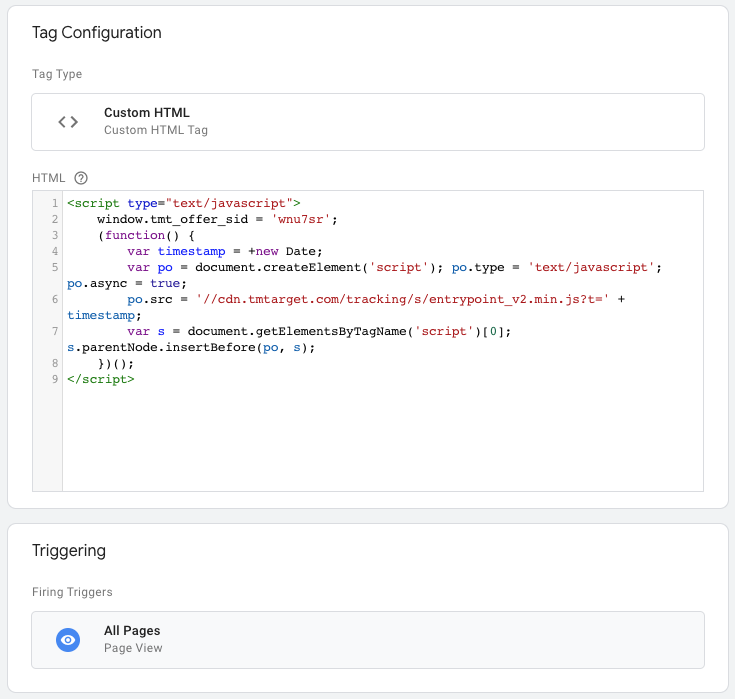
Create a new tag and choose a descriptive name, for example: “TC Tracking Entrypoint”
-
In the Tag Configuration choose ‘Custom HTML’ as the tag type.
-
Copy paste the entrypoint code from above in the HTML field that appears (make sure you added your offer slug!).
-
As trigger choose the default ‘All Pages’ option.
-
Click save and you’re done!
When you’re done it should look similar to this:
Installing the checkout script
The checkout script has to be placed on the order confirmation page(s) of your website. It should be placed as high on the confirmation page as possible to ensure it loads successfully. We suggest placing it right after the <body> opening tag.
You can grab the script for the type of transaction you want to track here:
Lead script:
<script>
  (function() {
    var el = document.createElement('script');
    el.setAttribute('src', '//cdn.trackmytarget.com/tracking/s/checkout.min.js');
    el.setAttribute('data-type', 'lead');
    el.setAttribute('data-offer-sid', '{offer-sid}');
    el.setAttribute('data-event-sid', '{event-sid}');
    el.setAttribute('data-id', '{id}');
    document.body.appendChild(el);
  })();
</script>
Sale script:
<script>
  (function() {
    var el = document.createElement('script');
    el.setAttribute('src', '//cdn.trackmytarget.com/tracking/s/checkout.min.js');
    el.setAttribute('data-type', 'sale');
    el.setAttribute('data-offer-sid', '{offer-sid}');
    el.setAttribute('data-event-sid', '{event-sid}');
    el.setAttribute('data-id', '{id}');
    el.setAttribute('data-amount', '{amount}');
    el.setAttribute('data-currency', '{currency}');
    el.setAttribute('data-code', '{code}');
    document.body.appendChild(el);
  })();
</script>
Before placing the script on the confirmation page(s), you should replace all the parameter values in the curly brackets {}.
Parameters
-
{offer_sid}required
Replace with 6 character sID of the Offer. You can find this value in Offer list of the marketplace or ask your account manager. -
{event_sid}required
Replace with the 6 character sID of the product group. You can find this value in the tracking tab when creating or editing an Offer or you can ask your account manager. If you want work with multiple product groups, follow these instructions. -
{id}
Replace with the ID you assign to the transactions in your own system. Required if you set up the Offer to require unique transaction IDs -
{amount}
Replace with the transaction amount. Do not use any thousand delimiter and use.as decimal delimiter (e.g.1234.56). Required if you want to payout a percentage of the transaction amount to your Publishers. -
{currency}
Replace with the three letter alphabetic currency code according to the ISO 4217 standard (e.g. EUR ). Required if you are using the amount parameter. -
{code}
Replace with the voucher code used for the order. Accepts all alphanumeric characters, hyphens (-) and underscores (_). Required if you are using voucher code tracking.
Installation with Google Tag Manager
-
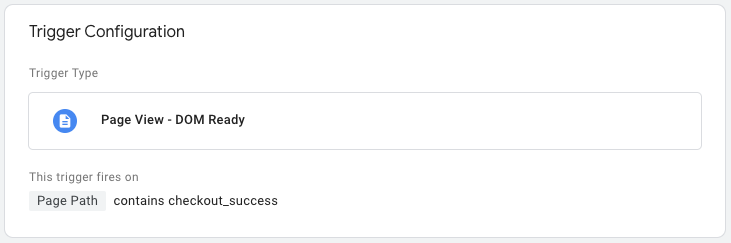
Create the trigger: Start by creating the trigger that fires on your confirmation page, if you already have such a trigger you can skip to step 2.
Choose
DOM Readyas “Trigger type” and for “This trigger fires on” chooseSome DOM Ready Events. As firing conditions you need to setPage Pathequalsand then set the path of the page you created in step 1, for examplecheckout_success.
-
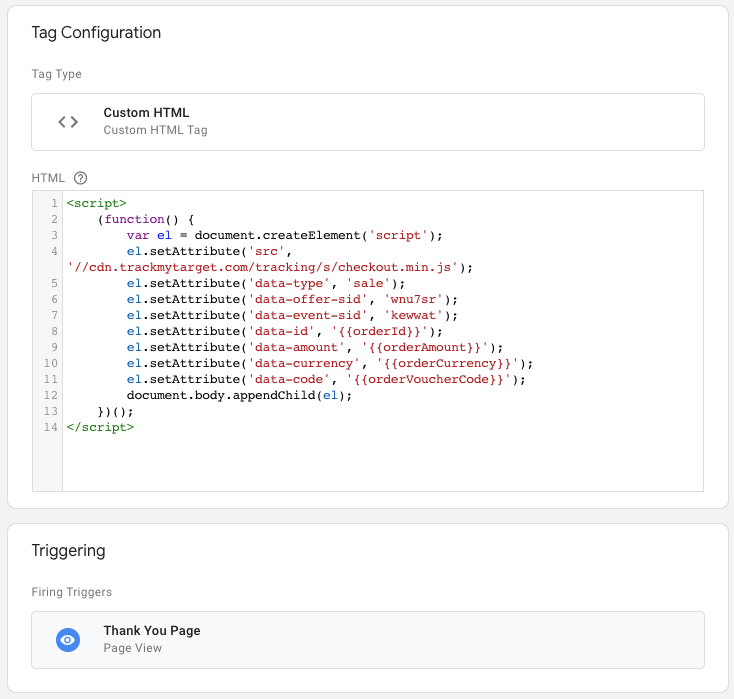
Create the tag: Next create a new tag for the checkout script.
-
Give it a descriptive name. For example “TC Tracking Checkout”.
-
In the Tag Configuration choose ‘Custom HTML’ as the tag type.
-
Copy paste the checkout code from above in the HTML field that appears. Make sure that you replace all the parameters. For some parameters, such as
data-id,data-amount,data-currencyanddata-codeyou need to use Google Tag Manager’s Variables. -
As trigger choose the trigger you created in step 1 and save the tag.

-
-
Publish changes: Finally, publish the changes you just made to Google Tag Manager.